GIT-101
Git is a free and open source distributed version control system designed to handle everything from small to very large projects with speed and efficiency. It is utilized to monitor alterations to files and facilitate teamwork among team members. It empowers developers to archive various versions of their files and cooperate on projects by monitoring changes introduced by each team member.
Git retains the historical record of file modifications within a repository, a centralized location housing all versions of a project. With each file alteration, a new version is appended to the repository, accompanied by a concise description of the amendments. This affords developers a clear overview of the project’s evolution and enables them to revert to previous iterations as needed.
Furthermore, Git allows developers to operate within their personal repository copies, known as branches, and converge their alterations into the primary branch when ready. This streamlines parallel work on multiple features or bug fixes, mitigating conflicts when merging contributions from diverse team members.
Git stands as a globally embraced version control system, harnessed by developers worldwide for collaborative projects and codebase management. It particularly thrives in the open-source community, serving as a pivotal tool for many organizations in overseeing the evolution of their software projects.
1. Prepare a repository for your local development environment.
It allows creating two things:
- a staging area in RAM
- a folder for the repository’s database (the folder known as “/.git/”), where the atomic changes to our code are saved.
git init
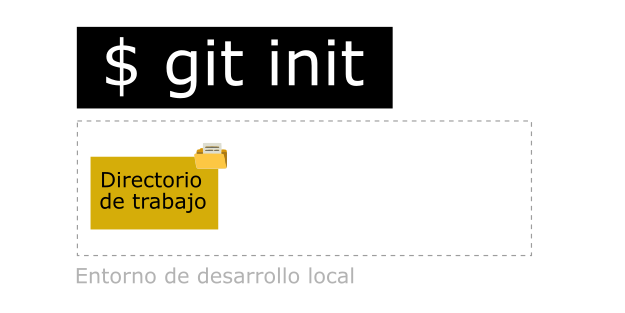
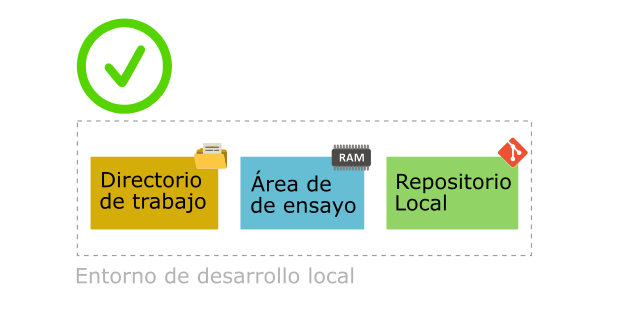
- Entorno de desarrollo local => Local development environment
- Directorio de trabajo => Working directory
- Área de ensayo => Staging area
- Repositorio local => Local repository
Staging area is a preparation area where files are sent before being committed to the database of historical changes for your code or project, also known as the “Local Repository.”
2. Adding or removing changes to your local repository
Once the repository is created, the files in your local development environment will have two possible states: “Tracked” or “Untracked.” GIT monitors changes only to the files that are in the “Tracked” state. If a file is “Tracked” and it has been modified, GIT will prompt you to include it again in your staging area before pushing that change to the local repository.
Adding changes to your local repository
During the development of a code, it is normal to make changes to the files in the working directory or create temporary files. To add or “stage” the changes to the local repository, you must first include the files in the staging area, allowing GIT to automatically track your changes. Use the following command to add changes to the database of historical changes in the repository:
git add <file1> <file2> ... <fileN>
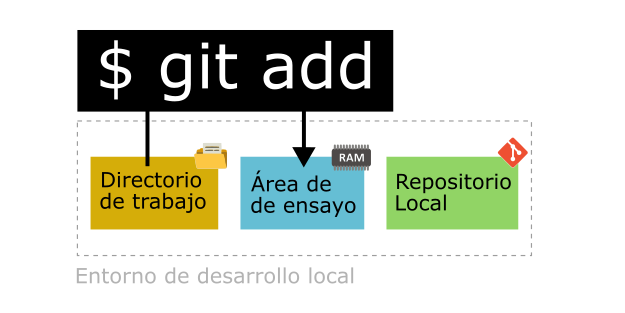
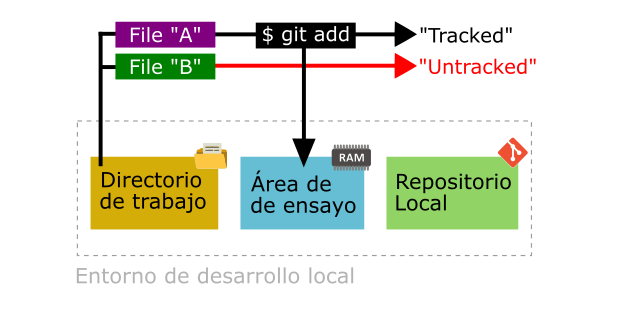
If you use the parameter “.”, all the files in your working directory with the “Untracked” status will be added to your staging area. You can also specify the individual name of a specific file, as shown in the following example:
To add all changes in the working directory to the staging area:
git add .
To add a specific file to the staging area:
git add <filename>
To display the different states of the files in your local development environment, use this command:
git status
To observe the changes that GIT has detected between the working directory and the staging area, use the following command:
git diff
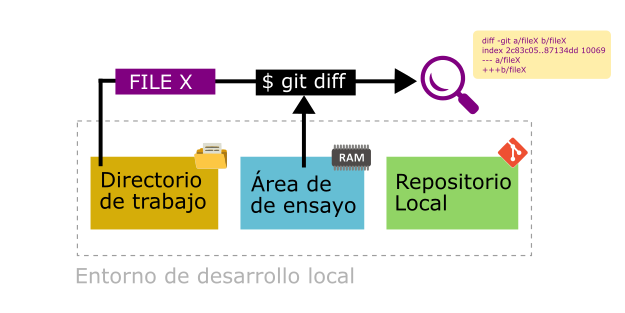
Deleting files from the local repository
To delete a file from the local repository, use:
git rm <file>
Warning: Remember that the file will be removed from both the local repository and the working directory.
Removing files that were added to the staging area
If you recently added a file to the staging area, you can undo that step with the following command:
git rm --cached <file>
Remember that it will not be deleted from the working directory.
3. Creating a snapshot of the working area in the repository database.
To create a lasting snapshot of your staging area in the repository’s database. The default name of the repository is “master.” If the -m flag is omitted, Git will summon a text editor to input the comment; by default, VIM is used, but other options such as Visual Studio Code can be set. Any “commit” with empty messages will be canceled.
git commit -m "<Comment>"
Remember that in order to make a “commit,” Git needs to know who we are. To achieve this, you need to run these commands in the global Git environment:
git config --global user.email "<email>"
git config --global user.name "<username>"
If you need to view the default configuration of your Git, use this command:
git config --list
If you need to see where your Git configuration is stored, use this command:
git config --list --show-origin
Once the “commit” is done, the following commands display the changes in the repository:
git log
git log <file>
The following commands show the “specific changes” to files starting from when the “commit” was created. When dealing with numerous changes, use the “up/down” arrow keys to navigate on the screen and press “q” to exit:
git log --stat
git log --stat <file>
If you need to see detailed changes to a specific file in the repository (it will display all commits that affected the file), use:
git show <file>
To compare changes between two snapshots of your repository’s database:
git diff <commit-id.old> <commit-id.new>
4. Retrieves a specific version of a file from a particular commit in your Git history into working area
To extract an image of a file from a snapshot in the database to the working environment, it’s crucial to know the reference of the repository’s database snapshot, commonly referred to as `<commit-id>`, which is a combination of characters and numbers. You can replace `<commit-id>` with the branch name, for instance, “master.”
git checkout <commit-id> <file>
